Showing posts with label flower garden. Show all posts

Wednesday, October 03, 2018

Pink Powder Puff Calliandra surinamensis

The Pink Powder Puff is one of the most interesting plant-tree! Taking a look at the Pink Powder Puff growing in my front yard garden, you're not sure what it actually is. Is it a dwarf-tree, or a plant, or a shrub?

Pink Powder Puff Calliandra surinamensis
Pink Powder Puff Calliandra surinamensis - August 27, 2018 PM
I am fairly confident that this type of mimosa is the Calliandra surinamensis of the Family: Fabaceae and Subfamily: Mimosoideae. It is also known as Surinam Powder Puff, Pink Powder Puff, Pompon De Marin, Surinamese Stickpea, and Officiers-kwast. It originates in the country of Suriname, in northern South America.

Pink Powder Puff Calliandra surinamensis
Pink Powder Puff Calliandra surinamensis - November 14, 2017
My Pink Powder Puff is now about one year old. The first couple of months, into cold weather, the plant did not achieve the look you see in the first photo above. It was approaching one year of age before it started to look like a dwarf-tree with quite the canopy. Right from the early age, it did have plenty of powder puffs but I don't believe I ever saw the bean-like seed pods until September 2018.
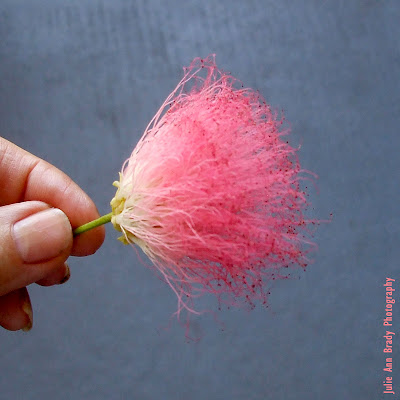
Close-up view of the Pink Powder Puff
Close-up view of the Pink Powder Puff - July 2, 2018
It was the month of September 2018 when I began to see what looked like bean pods sprouting all over my pink powder puff. Some had turned brown and opened. I decided to clip them off, dry them, and harvest the seeds.

Drying Seed Pods of Pink Powder Puff
Drying Seed Pods of Pink Powder Puff - October 2, 2018
Once you start clipping those pods, you realize just how many there are. I originally had only a few that I put on top of a bin in the shed. I couldn't understand a couple of days later why they were lying on the floor of the shed. Then I put the lot of them on a tray on top of the washer ... come back a day or so to find several out of the tray, on the washer, and on the ground.

Opened Seed Pod of the Pink Powder Puff
Opened Seed Pod of the Pink Powder Puff - October 2, 2018
I was standing outside the shed and could actually hear them POP when they opened up and again they were not in the tray. Just like the Mexican jumping bean!!!

Seeds from the Pink Powder Puff
Seeds from the Pink Powder Puff - October 2, 2018
October 3, 2018, it was late in the afternoon, around 5:30pm. I was out in the shed going through the seed pods to pull out those that opened and didn't yet release the seeds and picking up the loose seeds. All of a sudden, I heard a very loud SNAP!!! as one opened up, flew up in the air, hit the side of my left hand little finger and then flew on the ground next to the washer. I have never heard of such a thing ... it was kind of a violent action ... and very very strange. I rather suspected something like that after finding these all askew in the shed and then hearing something yesterday about this time as I was standing just outside the shed with the door shut. Like, WHO KNEW???

October 4, 2018 around 3pm in the afternoon ... I was out checking on how many seed pods had opened ... quite a few ... when they started ferociously SNAPPING. I lost a few that escaped from under the netting and flew off to my left into the shed. I sincerely think these are SNAP PEAS!!

Researching the seeds, I found a reference that tells you how to prepare the seeds for best use. It seems you need to scar them ... one recommendation was with sand paper. So, I think I will grab my emery boards and go to it before I try planting these.
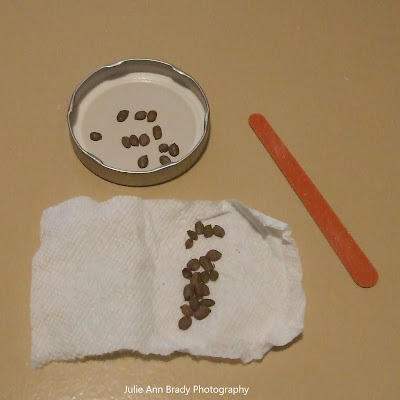
Scarified Seeds from the Pink Powder Puff
Scarified Seeds from the Pink Powder Puff - October 3, 2018
I found a bit of information on how the powder puff seeds should be prepared for planting. Although my variety is not the strigillosa, I believe this information is still applicable.
"Scarify and inoculate seed with strophostyles spec.1 before planting. Scarifying (nicking or roughing the seed coat) seed greatly improves germination, and establishment time after planting. Walker (2005) found that mechanically scarified seed ranged in germination from 74 to 85 percent. Pitman (2009) used sandpaper to scarify powderpuff seed and had similar results. The average percent germination of unscarified seed was 14 while the scarified was 96. In both experiments, physically roughing the seed coat resulted in better seed germination than unscarified, chemical or heat treatments. If scarified seed is unavailable, plant in the fall, and allow seed to over winter in the soil." --USDA-NRCS Powderpuff Mimosa strigillosa
October 3, 2018 at 4pm I had used a sandpaper emery board on 12 of the seeds gathered from the seed pods. I picked up a Jiffy Windowsill Greenhouse seed starter kit to use.

Jiffy Windowsill Greenhouse
Jiffy Windowsill Greenhouse - October 3, 2018
This is the first time I am trying this type of seed starter. It seemed pretty straightforward on the use. Open up the package as shown and then pour 1-1/4 cups of warm water into the tray. The peat pods will swell up.
Jiffy Windowsill Greenhouse Step 1
Jiffy Windowsill Greenhouse Step 1 - October 3, 2018
You can see in the previous photo how the individual peat pods have swollen after absorbing the warm water.
Jiffy Windowsill Greenhouse Steps 2-3
Jiffy Windowsill Greenhouse Steps 2-3 - October 3, 2018
In the next step, you gently open the tops of the peat pods by pulling at the netting cover. For the following step, I used a metal bottle stopper with a pointed-edge to create seed holes about 1/4 inch deep. I carefully dropped only one scarified seed in each hole although the kit recommends 2-3 seeds. I then gently covered the hole with the peat.

Jiffy Windowsill Greenhouse Final Step
Jiffy Windowsill Greenhouse Final Step - October 3, 2018
It's important to keep your kit covered as shown above. It should be kept out of direct sunlight. I placed mine on the kitchen sink near the outside window ... if I had enough room in the window base, I'd set it there. It is suggested that once you see a seedling that you should prop the cover open. And, once all seedlings have emerged, to remove the cover. You need to make sure you keep the peat pods moist. That's pretty much it ... now it is a waiting game to see if these seeds will sprout seedlings!! Hopeful.

EXPLODING SEED PODS


After witnessing many more of the ferociously opening SNAPPING seed pods, I started Googling to see WHY. First reference I found actually talked about exploding seed pods! about "the evolutionary innovation of a fruit wall that can store elastic energy through growth and expansion, and can rapidly release this energy at the right stage of development."
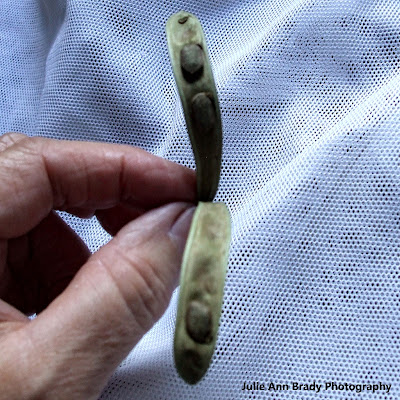
Exploded Seed Pod of the Pink Powder Puff
Exploded Seed Pod of the Pink Powder Puff - October 4, 2018
There are actually other plants that have the ability to shoot out their seeds! One plant has pods that can actually shoot out their seeds up to 50 feet! Boy, you have to be careful around these opening seed pods because you might lose an eye ... safety glasses recommended.

EXPLODED SEED PODS OF OCTOBER 4, 2018


Exploded Seed Pod of the Pink Powder Puff

Exploded Seed Pod of the Pink Powder Puff

Exploded Seed Pod of the Pink Powder Puff

Exploded Seed Pod of the Pink Powder Puff

It was a little earlier for me, in the afternoon of October 4, 2018, right around 3pm, when I was out in the shed tending to the seed pods. I had the white netting over them and could see that several had exploded open! At one time, the netting was actually askew from the ferocious nature of the exploding seed pods! I gingerly lifted the white netting cover and then SNAP!!! with such a force, a couple of the seeds pods opened and flew off the tray onto the shed floor. Holy smokes!

In the previous five photos, these were a handful of those seeds pods that fiercely opened or exploded as I was standing in the shed. Looking at each photo, you can see what seeds were still in the pod and indentations where the other seeds flew out. Pretty cool, eh??

HOW MANY PINK POWDER PUFF SEEDS?


Pink Powder Puff Seeds - Calliandra surinamensis
Pink Powder Puff Seeds - Calliandra surinamensis - October 5, 2018
Take a look at the circular collection of pink powder puff seeds! I've lost a few into the shed floor, given a couple of the seed pods to neighbors, and still have a few to open. That could easily account for 40 more seeds. I planted 12 seeds in the Jiffy Windowsill Greenhouse. I also left many early opening seed pods on the plant ... no telling how many seeds got shot into the ground ... maybe 100 or so?

How many pink powder puff seeds to you think are in that circular collection? Overall, how many seeds do you think have been produced this year by my PPP plant? Hey, leave me a comment on your educated best guess! I'd love to hear from you.

Pink Powder Puff - Calliandra surinamensis
Pink Powder Puff - Calliandra surinamensis - October 5, 2018 AM
Here is a morning shot of the Pink Powder Puff plant in my front yard garden! The late afternoon photos will show a more streamlined plant as the leaves seem to fold up for night fall. Pretty, isn't it?

PINK POWDER PUFF SEEDS - KNICKED


I've decided to try a second-go-around with 12 of the pink powder puff seeds. I had an empty pink egg carton available this morning. I grabbed my nail clipper and gingerly knicked or cut into the sides of the 12 seeds.

Pink Powder Puff Seeds Knicked - Calliandra surinamensis
Pink Powder Puff Seeds Knicked - Calliandra surinamensis - October 5, 2018
Using organic potting mix, I filled the egg carton's twelve spaces. With the metal bottle stopper, I created little pockets in each of the soil-filled spaces. I dropped one knicked seed in each pocket and gently covered with soil.

Pink Powder Puff Seeds Knicked in Egg Carton
Pink Powder Puff Seeds Knicked in Egg Carton - October 5, 2018
After thoroughly watering the soil until it was very moist, I covered the egg carton. I've labeled it with today's date and time initiated into the soil -- October 5, 2018 - 11:15am.

Pink Powder Puff Seeds Knicked in Covered Egg Carton
Pink Powder Puff Seeds Knicked in Covered Egg Carton - October 5, 2018 - 11:15am
To try and speed up the germination process, I have placed the covered egg carton on the outside lower step leading into my Florida Room. At the moment, it is getting some direct sunlight. I've also covered it with a dry dish rag. It should be out of the direct sunlight in maybe 1.5 hours. I will keep checking on it and move it into the shade if necessary!

UPDATE: Well, I hate to admit it, but I gave up on trying to grow the Pink Powder Puff inside. I have seen many a seedling popping up in my front yard garden ... I try to NOT pull them out, but let them be to see if another beautiful PPP might emerge.

MY ORIGINAL PINK POWDER PUFF

Julie Ann Brady - Pink Powder Puff - May 12, 2019
In the photo above, you can see a lot of growth on the edges which gave my PPP a drapey look. I decided to give it a bob haircut, so to speak.

Julie Ann Brady - Pink Powder Puff - May 15, 2019
My PPP weathered the bit of cold weather we had. I think there really wasn't a Winter to speak of in Leesburg Florida for the end of 2018 and beginning of 2019.

It is now March 2020! My PPP has had no issues with the previous Winter season spikes of cold weather. I can't tell you just how many times I have pruned the PPP to keep it contained within the space in the middle of my front yard. It has gotten so full and high that I need to use a rake to grab the projectiles for trimming. I have gotten so many compliments from neighbors passing by who marvel at the pretty pink powder puffs.

Julie Ann Brady - Pink Powder Puff - March 6, 2020
In the March 6, 2020 photo of my PPP you can see how it has taken on a heart-shape! That was not intentional but just sort of happened that way. I had trimmed the plant that morning and came inside to look out my kitchen window to take a photo. A heart is what I saw!!

Julie Ann Brady - Pink Powder Puff - March 13, 2020
One week later, on March 13, 2020, I climbed under the PPP and trimmed up about a foot and a half to clear growth from the base. It took a hand saw on a few of the tiny branches down below. I also pulled out the metal edging I had around the base that was put there to support the low-lying branches from lying on the ground.

Saturday, October 28, 2017

Antlion in Leesburg Florida

The Antlion is a very cool looking insect. The Glenrus gratus antlion is the most attractive or handsome variety seen in Florida. Some might mistake this insect for a dragonfly or damselfly because of the long shape of its wings.

Antlion - Glenrus gratus - Leesburg, FL
I observed my first Antlion on August 12, 2017 in Leesburg, Florida. This insect has the longest wings that are longer than its slender body. The markings along the edges of its wings look like dark stitches. Looking at its mandibles and shape, it looks like a stick figure.

COPYRIGHT NOTICE: Unauthorized use and/or duplication of this material without express and written permission from this blog’s author and/or owner is strictly prohibited. Excerpts and links may be used, provided that full and clear credit is given to Julie Ann Brady and JaguarJulie Blogspot with appropriate and specific direction to the original content. Special notice is given to such websites as Blogarama, BlogCatalog, and Pinsdaddy who have taken my copyrighted work without permission to use on their websites -- stop stealing my work!!

Researching this insect on the University of Florida website, it says this is a common and conspicuous insect in Florida. That's interesting as I've lived in Florida for over 25 years and never observed an Antlion until just recently!
Wheeler (1930) called them "demons of the dust", whereas children in the southern United States coined the term "doodlebugs" to describe their antics.
I have observed some interesting markings in the sand along my side yard that looked like "doodles" and probably were made by the Antlion. Learning more about this insect, the University of Florida reports that they are economically beneficial as "adults commonly feed on caterpillars and aphids, whereas the larvae feed on surface dwellers such as ants and other insect larvae."

I have also observed a few of the sand traps of the Antlion along the sand in my side yard. Personally, I am OK with these insects feeding on the ants as I have plenty of them here in Leesburg, Florida!! Want to know more about this curious winged creature? Check on the Wikipedia reference on the Antlion which tells you probably everything you want or need to know!

Saturday, March 11, 2017

Creating Curb Appeal in Side Yard

Do you have a side yard that is begging for some enhancements? Consider adding a garden area with stone and mulch to add some amazing curb appeal. We've previously shared the transformation of the front yard on this FSBO senior home in Lakes at Leesburg. Let us show you what we did in the side yard to tie the landscape design all together.

Creating Curb Appeal with a Side Yard Garden
19 Tortuga Way, Leesburg, FL 34788
Initially, we started our side yard project at the back area next to the opening into the carport and then expanded it to the back adjacent to the shed. Along the side, next to the carport, we dug up an area about 18 inches wide to include red stone edgers and red lava rock. We then stopped that portion of the side yard improvement and jumped to the front curb area.

It was a wee bit challenging to decide how to handle the placement of the water meter as it was set a bit lower than the rest of the area. It took a little maneuvering with the stone edgers to create an "indented" area. We think this actually looks like one of the states -- perhaps a little Utah? 

home that was lacking curb appeal - before
Oh woe is me! This place needs some CURB APPEAL !!!
19 Tortuga Way, Leesburg, FL 34788
Let us remind you of the lack of curb appeal before we got started transforming the exterior of this home! It is kind of amazing to see the finished result especially when you compare it to the before condition.

Creating Curb Appeal with a Side Yard Garden
19 Tortuga Way, Leesburg, FL 34788
The side yard area was handled as mini-projects -- kind of like little puzzle pieces that fit together to create one design. We initially planted Aztec grass and salvia in the front yard side garden. Heading to the back, in that side yard, we did a triangular garden area with more red mulch and red stone edgers. We opted to go triangular so that we could install a stone and rock patio area to connect to the golf cart path along the carport.

Creating Curb Appeal with a Side Yard Garden
19 Tortuga Way, Leesburg, FL 34788
In the triangular side yard garden, we planted sunflowers! For four consecutive years, we maintained sunflower gardens grown from seeds. The first year, in our Jacksonville back yard garden, we used four different variety of seeds -- mostly Burpee. The fourth year, the sunflowers were grown from the seeds of an amazing wine-colored Autumn Beauty sunflower.

After planting the sunflowers, we noticed little brown bunnies in the area. One morning, over half of the sunflower seedlings we had growing in our backyard garden were nibbled to the ground! The remaining seedlings were moved to this triangular garden and then surrounded by wire decorative edging and the red polka dot pinwheel. The bunnies seemed to leave these sunflowers alone ... but then the squirrels found them! What to do? We tried crumbled moth balls that were spread around the area.

Creating Curb Appeal with a Side Yard Garden of Sunflowers
19 Tortuga Way, Leesburg, FL 34788
In the photo above, you can see that the wine-colored Autumn Beauty sunflowers are doing well. Notice on the mulch around them how crumbled moth balls have been sprinkled there. It was a good deterrent to bunnies and squirrels.

Creating Curb Appeal with a Side Yard Garden of Sunflowers
19 Tortuga Way, Leesburg, FL 34788
Of all the sunflowers that I have grown in my four sunflower gardens, the Autumn Beauty variety is my favorite. I also discovered that squirrels in Jacksonville AND Leesburg, Florida LOVE the Autumn Beauty blossoms! I'm not sure what it is about this variety -- perhaps the wine color?

Creating Curb Appeal with a Side Yard Garden of Sunflowers
19 Tortuga Way, Leesburg, FL 34788
Once the Autumn Beauty sunflowers blossomed, the side yard curb appeal was pretty amazing. Neighbors were driving or walking by daily to check out the sunflowers. It is very satisfying to grow sunflowers from seeds ... I'd say my only "regret" -- if you can call it that -- is that sunflowers seem to have a life of little more than 90 days ... and then you need to start over. When the sunflower heads are read to cut from the plant to harvest seeds, I generally take out the plants.

Creating Curb Appeal with Front and Side Yard Gardens
19 Tortuga Way, Leesburg, FL 34788
Here is a view of the property after exterior enhancements -- virtually EVERYTHING has been "touched" with a designer's brush to create a visually-stunning finished piece. Classic Burgundy painted accents draw the eye across the front of this property.

If you love what you see, you can be the new owner of this stunning senior home in Lakes at Leesburg. We are pleased to offer for sale by owner this cute cottage-style, senior home at 19 Tortuga Way in Leesburg, Florida.

Monday, March 06, 2017

Creating Curb Appeal with a Garden

Does your home lack curb appeal? Are you looking for a do-it-yourself project that can add amazing curb appeal? Why not start with a front yard garden? Let me share an after shot first.

Creating Curb Appeal with a Front Yard Garden
19 Tortuga Way, Leesburg, FL 34788
In this after shot above, the front yard garden was the first DIY outside yard project that was completed early in 2016. In the photo, you can also see that the house was painted along with the driveway. Now, take a look at the before-before photo!

home that is lacking curb appeal before photo
Oh woe is me! This place needs some CURB APPEAL !!!
19 Tortuga Way, Leesburg, FL 34788
Luckily for me, I didn't have to have that magnolia tree removed; the previous owners took it out along with the side yard bush and that bush near the lamp post. From the before photo, you can see that ANY work in the front yard would have surely been an improvement.

Creating Curb Appeal with a Front Yard Garden First Day
Creating Curb Appeal with a Front Yard Garden - First Day
19 Tortuga Way, Leesburg, FL 34788
FIRST DAY - On the first day of this DIY project, I moved the triangular area of patio stones to the back yard near the shed. I would later repurpose that stone to create an offset patio area. In all of my landscape projects, I take an area at a time and finish it off with mulch. In this project, I opted for better red mulch that would later complement the sage green color of the house.

TOOLS & SUPPLIES - Shovel, metal rake, hand cultivator, trowel, gloves, bags. Before you get started digging up grass and weeds, you should call 811 before you dig.

Creating Curb Appeal with a Front Yard Garden Second Day
Creating Curb Appeal with a Front Yard Garden - Second Day
19 Tortuga Way, Leesburg, FL 34788
SECOND DAY - On the second day of this DIY project, the yard started to actually look like something good was going to happen!!! That area that was dug up this day was tough to deal with. I didn't realize that there was a plethora of nut grass throughout that area ... I was using the hand cultivator after I raked the dug up area. I would filter out the debris, by hand, to put in the trash bags. I was finding a lot of stringy nut grass that should have warranted more work!

Creating Curb Appeal with a Front Yard Garden Third Day
Creating Curb Appeal with a Front Yard Garden - Third Day
19 Tortuga Way, Leesburg, FL 34788
THIRD DAY - On the third day of this DIY project, I was working to try and finish an area across the front. You can see that red stone edgers encompass the finished area of the project along with red mulch. It was the second and third day of the garden project that neighbors were stopping me to ask, "what are you doing." I guess they hadn't seen any work done on this property in some time, so they were probably amazed!

Creating Curb Appeal with a Front Yard Garden Third Day
Creating Curb Appeal with a Front Yard Garden - Third Day
19 Tortuga Way, Leesburg, FL 34788
Here is another view of day three of the DIY project from the street. I was noticing that the red mulch had a bit of a different color ... thinking maybe the older red mulch was drier. The red stone pavers add a nice finished look to the front yard garden.

Creating Curb Appeal with a Front Yard Garden Fourth Day
Creating Curb Appeal with a Front Yard Garden - Fourth Day
19 Tortuga Way, Leesburg, FL 34788
FOURTH DAY - On the fourth day of this DIY project, I was starting to feel that the "end" was in sight for finishing off the area for the front yard accent garden. By this time, many neighbors had stopped to say something AND the park manager must have been summoned by a curious neighbor. He and I had a chat about the scope of that project and he drove off!!

Creating Curb Appeal with a Front Yard Garden Fourth Day
Creating Curb Appeal with a Front Yard Garden - Fourth Day
19 Tortuga Way, Leesburg, FL 34788
There's another photo of the fourth day of work ... thankfully, Home Depot is about one mile or less! And, driving a Jeep Patriot surely helps with these type of yard projects. I had to pick up more red mulch to finish off the dug-up area. Almost done! You may need some Aleve for your back -- like I did!

Creating Curb Appeal with a Front Yard Garden Fifth Day
Creating Curb Appeal with a Front Yard Garden - Fifth Day
19 Tortuga Way, Leesburg, FL 34788
FIFTH DAY - On the fifth day of this DIY project, I was more than a little thrilled to actually "turn the corner!" That meant I had reached the width of the front yard accent garden and was capping it off with the red stone edgers and then starting down the side of the house! You can see the "blank canvas" of the garden area.

Creating Curb Appeal with a Front Yard Garden Fifth Day
Creating Curb Appeal with a Front Yard Garden - Fifth Day
19 Tortuga Way, Leesburg, FL 34788
I love DIY projects that are completed in under a week's time. For me, five consecutive days is a lot of exercise ... no need to go to the gym. It was the middle of January, 2016 when I finished preparing the front yard for the flower garden. Knowing that Florida can have a freeze into March, I waited until March 1st to start planting!

Creating Curb Appeal with a Front Yard Garden March 1st
Creating Curb Appeal with a Front Yard Garden - March 1st
19 Tortuga Way, Leesburg, FL 34788
PLANTING! It was March 1st and I was ready to start planting in that front yard accent garden. It was lucky for me that I ran into a fellow at Lowe's while picking up some stone. He said he had some of the red stone edgers and brick pavers that I could have along with Aztec grass. The 8 clumps of Aztec grass across the front of the garden were from his yard!

Early plants that went in included 4 Firecracker plants, 4 Gardenias, and a Confederate Star Jasmine with small trellis.

Creating Curb Appeal with a Front Yard Garden March 5th
Creating Curb Appeal with a Front Yard Garden - March 5th
19 Tortuga Way, Leesburg, FL 34788
On March 5th, I added smaller flowering plants including Salvia, Kalanchoe, and assorted Dianthus. You can see rows of those flowering plants, left to right, with two rows of Dianthus nearer the house. To the far right, you can see a rectangular black flower pot that was used for cultivating sunflower seedlings.

Creating Curb Appeal with a Front Yard Garden March 10th
Creating Curb Appeal with a Front Yard Garden - March 10th
19 Tortuga Way, Leesburg, FL 34788
By March 10th, I was growing sunflower seedlings to transplant to the front yard garden. And, I had taken time to trim up the bushes that are across the front of the Florida Room. I do a trimming of the branches to create a tree look.

Creating Curb Appeal with a Front Yard Garden March 25th
Creating Curb Appeal with a Front Yard Garden - March 25th
19 Tortuga Way, Leesburg, FL 34788
Approximately 2 weeks later, on March 25th, you can see that the Salvia are doing the best with the Dianthus looking healthy, but the Kalanchoe is hanging in there. The Confederate Star Jasmine has been growing pretty well too. Daily watering of the new plants is important the first week or two!

CREATING CURB APPEAL WITH A GARDEN!

Creating Curb Appeal with a Front Yard Garden
19 Tortuga Way, Leesburg, FL 34788
Fast forward to not quite a year later. Some red polka dot pinwheels along with solar garden lights were added to the front. The periwinkles did spread throughout the front yard garden. The Aztec grass was dug up and replaced with Mexican Petunias. The Salvia didn't make it; only 3 Kalanchoe remain. The Dianthus is doing OK. The 4 Firecracker plants are probably triple the original size if not bigger. Three of them are down the side area and one is near the driveway. The Confederate Star Jasmine is prospering, so much that a large metal trellis was added.

Curb appeal can do a lot for a home. In this case, we continued adding to the "curb appeal" by painting the house and driveway. Why not consider a front yard accent garden if you want some amazing curb appeal?

Sunday, September 21, 2014

Front Yard Accent Garden DIY

Do you have an unsightly area in your front yard? Have you considered doing a low-maintenance accent garden? Let me show you how relatively easy and inexpensive it can be. Add some curb appeal and value to your home! I should know as I have been doing it yourself - or should I say MYSELF - for the 3.5 years I have lived in my house. I am one of the blondes that DIY; you know?

front yard accent garden diy completed
Front Yard Accent Garden DIY - Complete
Photo Taken : August 4, 2014
There is a photo of the front yard accent garden upon completion on August 4, 2014. From that view, it doesn't look like that large of an area. It is a bit of an optical illusion. We'll show you some other views so that you get a good idea of the space we used for this DIY accent garden.

BEFORE PHOTO - WHY DIY?

front yard accent garden area before photo

What is particularly interesting about that area of the yard? Behind the neighbor's fence is a vegetable garden. For the most part of the year, it is a barren ground that drains and leeches into my side yard and my front yard, as you can see in that last photo!

This year, I was further challenged when the neighbor in the pink house next to them came over one night with his pressure washer. He washed their fence for them. Not sure whose idea it was to pressure wash the fence; probably not my next door neighbors! The next morning when I came out to check my front yard, I found a mushy wet area where the grass was already being challenged. In a few days, the grass was no longer green! Thanks to my neighbor(s)' actions! Wow! How about all that dead grass? I had already put down sod once. I wasn't going to try sod again.

PUTTING DOWN SOD - AUGUST 2012

front yard accent garden plot area with sod

In August-September 2012, I put down sod in that very area! When I moved into my home in June 2011, the next door neighbor was waving his arms at me that I needed to water that area of the yard. "Yeah, Yeah! I am just moving in ... I'll take care of it." Hey, you know water isn't free???

I had previously dealt with the same type of grass issues in my side yard next to the neighbor's fence. You might have seen my side yard project with my mexican petunia garden. So, I was up to doing another accent garden out of necessity!

PREPARING THE PLOT

front yard accent garden dug plot

It is important when you are doing any digging in your yard, to know where the cable and any other utility lines are placed. When I had my privacy fence installed, they had contacted the company that comes out and marks the location. However, my fence installer did take out my AT&T cable! So, I know where it has been relocated in my yard -- at the very bottom of the photo!

Digging up that area of the yard wasn't too difficult since the grass had been challenged. I think I might have filled 4-5 black yard bags with the dead grass pieces. I've dug up a lot of yard for my gardens, so I don't mind this activity. I always were my Playtex Handsaver Gloves! Oh boy, but I have gone through a lot of gloves in the past 3.5 years! Every kind you can think of too. It seemed even the heavy duty gloves didn't always protect my acrylic nails. So, I ended up relying on the Playtex Handsaver Gloves.

I found a handy technique for clearing the plot. After I would use my shovel to dig into a rectangular patch of grass, I'd sit down on the inverted blue plastic bucket. Then, wearing my rubber gloves, I'd separate the dead grass [and some weeds] from the soil. When I'd fill a black yard bag, I'd move that to the other side yard behind the fence until yard waste pickup day.

MATERIALS LIST FOR DIY

front yard accent garden diy materials list and cost

My materials list for this do-it-yourself project included:

  • One - 1.5 CF tree and shrub soil @ $7.67
  • One - Fulton 15.6" red square patio stone @ $3.99
  • Twenty-two - Fulton 15.6" red scalloped edging @ $1.78 = $39.16
  • Five - 1.25 qt Liriope Aztec grass @ $1.89 = $9.45
  • Two - 2 gal. Bottlebrush plants @ $10.98 = $21.96
  • Five - 2 CF Preen russet red mulch @ $4.49 = $22.45
The total cost of materials, with tax, was $112.01. The total time spent on this DIY project was under 6 hours. I figured I spent about 2 hours preparing the plot; less than 2 hours back and forth to Lowe's to pick up the materials; and less than 2 hours to install the DIY garden.

If you were to contract to have this DIY project installed, I estimate it would cost 2x the materials list = $225.00 plus 6 x $50/hour manual labor for a total of $525.00.

I LOVE BOTTLEBRUSH PLANTS

Selecting the plants was a no-brainer for me since I already had two Bottlebrush plants in front of the privacy fence gate. I've also got the Liriope Aztec grass also in my other side yard on the left side of the house; it makes a nice accent!

In my DeerCreek Country Club home, we had a Bottlebrush plant at the front entrance. My now ex-hubby let me prune that plant a couple of times. Ouch!! I do believe he might have finally moved it to the back yard.

I actually found that you can buy the plant, Bottlebrush Tree Plant Red Cluster Callistemon Rigidus Starter Size through Amazon! It was because of the red flowering pinecone-like clusters that I selected this plant for my front yard. I have a red front door along with Holland red and gray brick. Plus, the plant complements the patio stone and scalloped edgers.

THE LAYOUT

To get an idea on the measurement of that triangular garden, there are ten 15.6 inch red scalloped edging stone down the property borderline. That's 156 inches of stone across a distance of some 163 inches. At the bottom left of the layout, there are seven 15.6 inch edgers in the 110 inches. You can see that there is a 36 inch open area for access to the privacy fence [for mowing the back yard]. I placed the one Fulton 15.6" red square patio stone there as a stepping stone to the four such stones directly behind it. On the top left of the area, are two of the 15.6 edgers.

AFTER PHOTO

front yard accent garden diy completed
Front Yard Accent Garden DIY - Complete
Photo Taken : August 4, 2014

I SHOULD WRITE A BOOK!

That's what my mom keeps telling me. I've not officially written a book, but I have written lots of blog posts and other online content. I've not yet charged anything for my DIY tips. I'd love to hear if I have inspired you to try your own DIY project.

So, here is another resourceful gal's gardening tips. In Easy Front Yard Gardening: Basics of Front Yard Garden Design, the author, Shirley Dianne Lise, delivers her self-help guidebook.

Get over 85 pages of instructions to design and complete your very own front yard garden. The bottom line is curb appeal!

I designed my front yard accent garden in such a manner that I could carry it down the property line to the curb. I've not gotten to that point yet, but it is a consideration. The other benefit, aside from the curb appeal, is the low maintenance.

How does your garden grow? My bottlebrush plants are starting to flourish! And the Aztec grass is looking pretty good too.