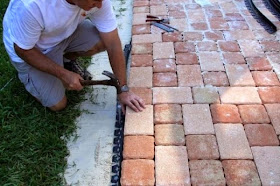
This is a do-it-yourself project that you can knock out in one weekend. See that picture? That is the ex-hubby, working with the actual materials we used! You can use this same DIY principle to create a walkway for your garden.
Make that patio larger or smaller; it is your do-it-yourself project. You decide how big or how small you want to make it as it is scalable up or down by following the pattern layout we have provided.
I have included pictures from our actual job showing you a before and after picture along with step-by-step instructions and pictures. You too can create a beautiful patio for your home and garden with this step-by-step how-to!
You know, I was so proud of my hubby [now the ex] because it was well-planned, very organized and quite timely from start to finish! You can do it. Start now on your very own do-it-yourself patio.
Photo Credit: Working on that DIY project by JaguarJulie w/the ex.
Have You Ever Worked With Patio Stone Pavers?
Are you a DIY Handyman? What is your experience level?
- I'm a newbie!
- I have watched someone else.
- I am an expert!
My Confession : I Was a Newbie
And, you too can learn how to create a beautiful stone paver patio!
"I am so thrilled to bring you our patio paver project in an easy to follow format. You can do it too! Recently, I completed another patio stone paver project all by myself. One step at a time!"
Folks, fast forward. Today I am divorced from my industrious hubby who you can see working in that intro module. We did a nice job of creating that patio with the stone pavers. I am happy to report that I used my experience on that project and have created another smaller patio in my new home.
The challenging part can be getting all the materials to your home with a sports car. It helps if you have Home Depot or Lowe's deliver your materials. --The Brand Ambassador, JaguarJulie!
P.S. I was the Official Squidoo Backyard Gardener Contributor! Did you know that? Well, you probably guessed it. But, I bet you didn't know that I also am one of the Blondes that DIY! #blondesthatdiy
An Overview
- Determine the layout for the patio area.
- Determine the style of pavers you want to use and how many of each size you will need.
- Tools you will need: flat edge shovel, Tamper, level, potato rake, wheel barrow or hand truck, two 5' x 3/4" steel pipe, 3-4' length of 2x4.
- Materials you will need: Step one base gravel, step two leveling sand, pavers, paver edging and stakes.
- Determine the pattern you will use with your pavers. You can go from a simple mix to elaborate patterns with different colors and sizes of the pavers.
- Other important requirement is a good back. This project is somewhat physical but you can do it at your own pace.
- You can get "how to" information from brochures at Home Depot and Lowes.
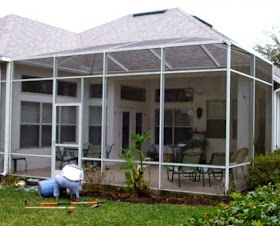
Before View of the Patio
This is an actual before picture of our back patio area. We actually underwent a home renovation project to enclose our patio before we decided to create a back yard patio with stone pavers. This picture gives you a good perspective of the overall job.
Materials for Patio Paver Project DIY
Stone Pavers, Step 1 Paver Base and Step 2 Leveling Sand
The pallet of materials for your patio stone pavers project.
 |
| A 100 Square Foot Patio Costs About $600.00 DIY |
Materials List and Cost
Patio Stone Pavers and Step 1 Paver Base and Step 2 Leveling Sand
Home Depot delivered the pallet of materials needed for this 100 square foot patio project. Estimated cost of materials: $600.00 which includes a $79.00 delivery fee.
120 - 6" x 9" Concord Cobble 45mm orange/sand stone pavers
175 - 6" x 6" Concord Cobble 45mm orange/sand stone pavers
15 bags - Step 1 Paver Base
20 bags - Step 2 Leveling Sand
NOTE: Before this pallet of materials was delivered, we started the base with a separate load of 15 bags - Step 1 Paver Base. We brought those home in the back of our Nissan Murano -- and then opted to have the rest delivered.
 |
| Tools You Will Need Flat Edge Shovel, Tamper, Level, Potato Rake, Wheel Barrow or Hand Truck, two 5' x 3/4" Steel Pipes, 3-4' Length of 2x4 |
Establish a Pattern
Determine the pattern you will use with your pavers. You can go from a simple mix to elaborate patterns with different colors and sizes of the pavers. This is a easy to duplicate pattern using a mix of 6" x 6" and 6" x 9" Concord Cobble 45mm orange/sand stone pavers. For our needs and budget, and since it was our first attempt at laying the pavers, we kept it on the simple side with using a mix of 6" x 6" and 6" x 9" bricks. With a little trial and error, we found a repeating pattern that worked out well for our layout.
 |
| Other Important Requirement: A Good Back! This project is somewhat physical, but you can do it at your own pace. We found it rewarding with only one minor back outage. |
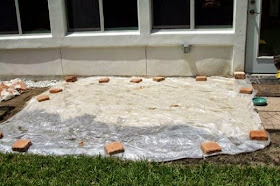
Working with Step 1 Paver Base
Keep it Dry!
Our little do-it-yourself patio stone paver project was only 8' x 13' which tied into an existing 3' x 4' concrete pad. The hardest part of the project, other than hauling around a bunch of heavy bags of dirt and stacks of bricks, is the initial grading of the ground to get the level and the slope to tie in to the surroundings. We had to work off of the concrete stoop to start and grade the slope down from the house. The best way would probably be to carefully put strings with level indicators, measuring the height from the ground to get the best consistency with the right slope. We did not have the patience for that and pretty much eyeballed it with spot measurements in the key places.
If you have grass to remove, we recommend using a total vegetation killer ahead of time. After the grass has died, dig out most of it and rake out the area to the approximate grade you want. Tamp down the dirt, smooth out the lumps and tamp some more.
Tamping Down the Step 1 Base Gravel
Pour in the base gravel and spread out to have at least a one inch layer. If your back is still intact, tamp away again. If the twinges start, take a break and a couple of your favorite pain killers and muscle relaxants and come back later.
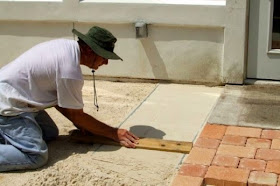
Leveling the Step 2 Leveling Sand
Once the step one gravel is tamped in place the fun can begin. Lay down the two lengths of pipe about 3' apart, working in a direction down grade. Pour down the leveling sand and screed back and forth with the 2x4 to get a smooth level fill between the pipes. Fill in the grooves left by the pipe. Sprinkle the sand in and lightly tamp in and smooth with your fingers. I found it best to screed a few side by side sections at a time, laying the bricks as you go. Once the sand is down you do not want to disturb it.
Duplicating the Pattern
It is relatively easy to duplicate your pattern with the patio stone pavers by referring to your pattern guide. Once the bricks are placed, you can walk on them to place the next section. This is the fun part because it goes relatively fast after the hours of the grunt preparation work.
Adding More of the Step 2 Leveling Sand
Continue working in square sections. Repeat the process where you lay down the two lengths of pipe about 3' apart, working in a direction down grade. Pour down more of the leveling sand and screed back and forth with the 2x4 to get a smooth level fill between the pipes. Fill in the grooves left by the pipe. Sprinkle the sand in and lightly tamp in and smooth with your fingers.
Midway -- Leveling Step 2 Sand
And Continuing the Patio Stone Pavers Pattern
You are about midway through your project and starting to feel like a pro at working with the patio stone pavers!
Finishing the Placement of the Patio Stone Pavers
If you have measured your patio accurately, you should find that you have enough of the stone pavers. Our project was almost perfect, as we needed 2 more of the 6" x 9" and 6 more of the 6" x 6" patio stone pavers. Ah, the end is in sight!
Preparing the Patio Stone Pavers for Edging
Once the bricks are all in place, you then put down the retaining edge.
Securing the Edging of the Patio Stone Pavers
Adding stakes to your edging will keep the bricks in place.
Adding the Remainder of the Step 2 Leveling Sand
You have finished edging the patio. Next you will want to fill in the spaces between the pavers with the leveling sand. This works much better if the sand is good and dry. Sweep the sand into the cracks and finish by hosing off the excess.
Completing the Addition of the Remainder of the Step 2 Leveling Sand
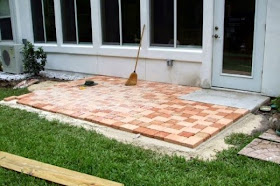
The patio is finished! Stand back and enjoy the look of your new patio to get an idea of how you will want to landscape around the stone pavers.
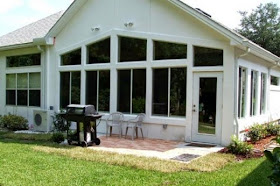
Drumroll -- After View of the Patio
Adding the finishing touches to the patio with sod and shrubs. We waited about one week before we put our outdoor gas grill and chairs on the patio stone pavers to ensure that the stones had settled. Now you are ready for entertaining!
Final Approval of the Patio Paver Project DIY
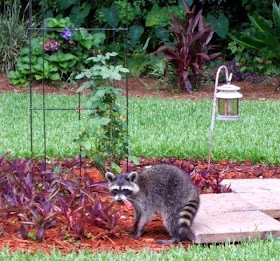
Receiving the Approval of the #1 Neighborhood Resident is Important! - Rocky the Raccoon has approved the patio stone pavers job!
We were finishing up the patio project when who should show up? It's Rocky the Raccoon who has been kind enough to actually pose for another lens in a photo caption contest.
 |
| How To Tips to Create a Patio With Stone Pavers You can get "how to" information from brochures at Home Depot and Lowes. Some patio paver projects tips are also available on the internet. |
Need More Patio Paver Ideas?
Get a copy of Pavers 101: Patios and Other Projects You Can Do. We all could use some inspiration with our DIY projects!
From a wonderful circular patio centered around a firepit, to a demonstration walkway that illustrates how to lay basketweave, running brick, and herringbone patterns, this book is the perfect resource for anyone who wants to undertake a great home improvement project.
Learn how to lay the groundwork, study details for edging and popular paver designs, and finish up like a pro. Clear photos detail every step in the process, and a gallery of more than 100 finished projects will inspire you to get to work. All you need is the muscle and a good back of course!
More Patio Stone Projects!
I moved to Leesburg, Florida in November 2015 as a single senior gal. I believe this original patio stone paver project with the ex-husband inspired me to try my own stone projects by myself. In February 2016, I designed and completed a golf cart path stone project down my side yard.
 |
| Julie Ann Brady - Golf Cart Path Project in Leesburg Florida |
 |
| Julie Ann Brady - Golf Cart Path Project in Leesburg Florida |
I've also used eighty 16-inch patio stones to create a patio area in the side yard to the West of my house. That was a lot of manual labor getting the stones at HomeDepot and bringing them home to place them in the side yard. Girl Power!!
Since those stone projects, I've now created two walking paths through my front yard garden with twenty-six of the 16-inch patio stones.
Thanks for visiting!
Did you find this step-by-step project helpful and easy to follow? Do you have any questions about any of the steps on how to work with patio stone pavers? Have you actually done a job like this yourself? Would you be able to create your own patio? I'd love to hear from you. Please take a moment to drop me a line!
History: How to Create a Patio with Stone Pavers was originally created on Squidoo by JaguarJulie on July 13, 2009. On July 14, 2009 this lens earned the Squidoo Purple Star Award for quality content.










2 comments:
I really like the look of the finished stone pavers in This back yard. If I do this in my own back yard I will be sure to follow all of your step very closely. Your section on leveling is probably the most important part. If the sand isn't level then the pavers themselves are going to not be level either. http://www.hlstoneworld.com.au
Excellent!! and easy to follow!. Thank you!
Post a Comment