Today I am sharing my delicious Baked Eggplant Parmesan recipe with my readers. For years, I have been enjoying other people's recipes for this nutritious vegetarian dish. It was high time that I make baked eggplant parmesan in my own kitchen. This is one tasty dish that surely tastes better than it actually looks! The challenge is how to make it look pretty on a plate.
Well, at least it is a pretty plate! You've probably seen the Corelle Bamboo Leaf Square Round 16-Piece Dinnerware Set a lot in my various food recipes. I really love the square shape of the Corelle dinnerware along with the pretty bamboo leaf design.
My Baked Eggplant Parmesan Recipe Cost
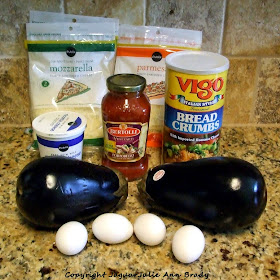
I went shopping at my local Publix to pick up the necessary ingredients. So, how much does it cost to make?
I didn't need to pick up the olive oil, which I used to coat my two baking dishes, since I already had that item. You get a pretty good idea how much it will cost to make baked eggplant parmesan. I spent a little over $30.00 on that shopping trip. Depending upon your serving portions, you can easily serve up to 8-12 with this recipe.
It surely isn't a cheap dish as the cheese cost is a bit much. You may opt to use a bit less cheese in your recipe! In my ingredients photo below, you don't see the second jar of spaghetti sauce that I used.
My Baked Eggplant Parmesan Recipe
Ingredients:
2 bags shredded mozzarella cheese
2 bags shredded parmesan cheese
8 oz. ricotta cheese
2 jars spaghetti sauce
3 cups bread crumbs
4 eggs
6 tablespoons of olive oil
Dash of salt and pepper
Instructions:
Prepare for bread crumb dip: Crack the eggs into a dipping dish and blend well. Pour the bread crumbs into another dipping dish.
Prepare baking dishes: You will need two baking dishes. I use a large Pampered Chef rectangular stoneware dish and a Corningware square casserole dish. Add olive oil to bottom of both dishes and distribute evenly.
Remove the skin from the eggplants. Cut into ½ inch slices. Dip the eggplant slices in the egg wash and then into the bread crumbs; generously coating both slides with bread crumbs.
Add one layer of the eggplant slices to your baking dishes. On top of that layer, distribute the ricotta cheese in teaspoonfuls. Add one jar of spaghetti sauce on top. Sprinkle one bag of mozzarella cheese and one bag of parmesan cheese on top.
Add second layer of the eggplant slices to your baking dishes. Add second jar of spaghetti sauce on top. Sprinkle second bag of mozzarella cheese and second bag of parmesan cheese on top.
Bake at 350 deg. F for sixty minutes.
Eggplant Parmesan in Baking Dishes
I love my Pampered Chef rectangular stoneware baker! You can find something like it at Amazon; Rectangular Baker 9" x 13". I love how the stoneware evenly distributes the heat for baking your casserole dish.
That is my 2 qt. baking dish from the Corningware StoveTop 4-pc Blue Cornflower Casserole Set. I have had this casserole set for over forty years! It sure does go the extra mile.
My Baked Eggplant Parmesan Recipe - Done!
My Baked Eggplant Parmesan Recipe - Freezer Dishes
I opted to only prepare three corningware freezer dishes and the rest went in the refrigerator. I sure had more than my fill of baked eggplant parmesan for a lot of meals. You probably don't want to prepare the full recipe if you are a single person ... not unless you invite the family over for dinner. This would be a great recipe to prepare as a Thanksgiving side dish! If you are attending a family get-together, you can take the stoneware casserole dish and keep the corningware dish for yourself!
What's different about my recipe? In some other recipes, you will bake the eggplant slices first. I personally prefer to not go through that extra step, but instead to bake the two dishes a bit longer to ensure the eggplant is fully baked. Also, you may opt to not add any extra salt and pepper to your recipe and let your guests season their own dishes. I find the ingredients I used had enough seasonings for my personal taste. I've also noticed that in some recipes, the skin is still on the eggplant!
Eggplant Nutritional Information
Hey! They say you should eat more eggplant as it is good for you. And, if you find younger eggplants, to leave the skin on for additional nutritional benefits. Check out the facts on eggplant nutrition from that printer-friendly page!
P.S. The next time I prepare My Baked Eggplant Parmesan Recipe, I will be cutting the recipe in half.
Personal observations about things that matter from a retired corporate marketing professional, now blogger/designer.
Pages
▼
Saturday, October 11, 2014
Saturday, October 04, 2014
How to Dye your Hair Blue - Ion Brilliance Sky Blue
Hey, want step by step instruction on How to Dye your Hair a Blue Color and not feel blue about it? Well, you've got to the right place!
Do you want to know how to dye your hair a brilliant blue color? Well, my niece Rachelle recently decided to dye her hair blue! The moment I saw that first picture of her with her brilliant blue hair, I was amazed. I asked her, what is the name of that color? She said it was Ion Brilliance Sky Blue.
When I was growing up, we always talked about the old ladies with blue hair. Little did I know that blue hair on a younger gal could be so beguiling!
This is my interview with my niece, Rachelle Lesteshen. We asked her to tell us "how to dye your hair a blue color ... and not feel blue about doing it!"
P.S. By the way, we opted to add a little blue for our callouts throughout this page. It seemed kind of appropriate, you think?
Photo Credit: My Niece Rachelle after using Ion Color Brilliance Brights Semi-Permanent Hair Color Sky Blue. All photos of Rachelle edited by JaguarJulie.
What a thrill to interview my niece!
Who knew it would be about blue hair? Hey there, this is me! For a brief moment in the hair coloring process, my niece had hair that looked a bit like mine.
And, then she continued on to become a brilliant blue with Ion Color Brilliance Brights Semi-Permanent Hair Color Sky Blue.
I've always love the blue color, but hadn't thought about what it would be like to have blue hair! Perhaps you've seen my article on The Beautiful Color of Reflex Blue?
Well, after seeing my niece with her new jazzy color, I think I am liking that blue.
At my age, I am not brave enough to give this a try. Although I do believe I might try a wig of that color.
P.S. After putting together this interview with Rachelle, I was rather surprised to find so many young gals had actually picked this color and done YouTube video reviews! It seems to be THE color to try!
Why did you pick this color?
Why did you decide to go blue? Blue is my favorite color and I've always been drawn to brightly colored hair. I think it looks pretty.
I've always liked this color and had long thought about trying it. I guess I got the bug one weekend and decided to take the plunge.
In the past, I've actually tried other products to change my hair color, so this wouldn't be the first time. At least I love the color blue!
Had you considered another color? I only wanted blue, but I had thought about using a darker shade or another color in case the bleach wouldn't go light enough. I had been dying my hair red and dark brown in the past and it can be difficult to strip out colors with red tones. Once I saw that the bleach was getting it light enough, I was very happy I went with this shade of blue.
Dare to be a little different! I always knew that about my niece ... she is brave enough to be bold and unique ... even in her hair color.
Foiling the hair to bleach it!
Did you need somebody to help you? A friend helped me! I needed help with bleaching my hair because I had never done that by myself before and I don't think I could reach the back of my own head to do the foils back there if I had tried.
My hair is pretty dark, so I needed to bleach my hair to a light blonde.
There are a number of additional products we could have used. Color strippers, toners to remove the yellow, etc.
To cut costs and because I was pretty confident that the bleach would work, we just bought lightener and the dye.
Foil is all on
I think I like this look!
Why foil? It's used to help control the bleach and keep it from getting on the areas you don't want bleached, like your roots.
We used two products from Sally's, the Salon Care Blue Flash Powder in a one ounce size along with a 30 volume creme developer.
The flash powder is an excellent product that got my hair light pretty fast without damaging it. I didn't pre-lighten my hair. I just went straight to bleaching it.
If you do not get your hair light enough or if you are not able to remove all the yellow tones from your hair, this color will not work and could turn green! (Yellow + Blue)
Hair has been bleached blonde
I like it!
Did you consider staying at the bleached color before continuing? I would probably never choose to be a blonde because I don't think it looks good with my skin tone and my eyebrows are really dark and would require lightening, too.
However, we were kind of surprised at how nice my hair color looked after bleaching!
I wish I could handle this type of blonde ... looks a little strawberry.
It doesn't really go well with my skin tones, don't you agree?
Hmmm, this color looks pretty nice!
Yes, I think I look like a movie star.
Hmmm, which one? Hey, let's wait a moment while I admire how I look.
Now my hair was to a perfect bleached color and ready for the next step in the process.
I did not condition my hair after bleaching so that it would be receptive to the dye.
Oh well ... time to move on.
What other colors would you try? I'm willing to try teal and purple and maybe a bright red.
Ooops, there it is!
It's kind of messy stuff.
Why this brand? Originally, I was looking at the Manic Panic brand, but my friend did some research and found that the Ion Brilliance brand and this color was more vibrant and tends to last longer.
Where did you buy it? I was able to purchase this from my local Sally Beauty Supply store.
How many boxes? We used 3 boxes. Boy was I thankful that I bought 3 tubes of the sky blue dye!
My friend who was helping me had on rubber gloves and a tie-dye t-shirt. How appropriate, you know? We were pretty careful to keep most of the stuff on my head.
I used some color remover wipes to take the color off my face and skin when it strayed. Once we got the stuff applied to my head, we wrapped the hair with some saran wrap.
Overnight application?
Hey, who knew?
How long did it take? It took a long time. We probably spent 5-6 hours on bleaching and applying the dye.
I ended up sleeping with the dye in my hair and washing it out in the morning.
How long do you think you will you stay with this color? I've wanted to go blue for years and years, so I'll probably keep it blue for at least the summer, if not longer.
It requires quite a bit of upkeep, though. I have dark roots, so they will have to be re-bleached frequently and the blue fades quickly.
If I get tired of all that, I may try a darker blue or something else.
Let's summarize the how-to step-by-step instructions!
What were the steps ... So I see you had to bleach your hair first? I didn't realize that would be a step! First of all, we are not professionals and we were just trying this for fun, so our techniques may not be what most consider correct. These are our how-to, step-by-step instructions that we did in my home.
#1 THE BLEACHING PROCESS USING FOIL: I had to bleach my hair because the blue would be brighter on really light hair and my hair was previously dyed a dark brown.
My friend clipped my hair into sections to keep it out of the way. She then mixed up the lightener, put a piece of foil under my hair, and applied the bleach solution to about one inch sections just on the ends of my hair, making sure to avoid the roots/uncolored areas of my hair.
This is because the hair closest to the scalp will bleach more easily and more quickly than the rest of my hair. Those areas should be saved for the last 15-20 minutes of the bleaching.
After applying the bleach solution, the foils were then folded up neatly. This step was then repeated multiple times until all the hair was done. We left the bleach on and checked the process and color about every 20 minutes.
Once the hair on the back of my head was at the right shade, we started removing the foils in the order that we did them in, giving the rest of the hair time to get to the same color. After they were all removed, we applied bleach all over, focusing on my roots. This stage made my scalp tingle a lot.
#2 RINSE AND DRY: Once we were happy with the overall color of my hair, I rinsed it out. We then dried it to check the color. We both felt that the ends were still too yellow, but my roots were the perfect color.
#3 REPEAT THE BLEACHING PROCESS: We decided to do another bleaching session for the ends of my hair to get them lighter. We repeated the foil process, continued to check the color, and washed it back out when it was how we liked it.
#4 APPLYING THE BLUE DYE: At that point, we were ready for the blue and we applied it all over. I decided I wanted to leave it in for a long time to maximize the brightness of the color, so I slept with the color on my hair.
#5 RINSE WELL: I woke up in the morning and washed it out, waiting for the water to run clear.
#6 DEEP CONDITION: I then applied one of my deep conditioning packets to help restore my hair after the damage from the processing it went through.
How do you like it?
It seems pretty uniform.
We were so thrilled to see the overall colors throughout my hair after we rinsed the dye. Keep in mind, you should not shampoo after because it will remove some of the colors.
What did it cost to go blue? I estimate that it cost us about $40-$50 dollars for just the hair dye ($15), powder lightener tub ($20), large container of developer ($4), and a few packets of deep conditioner ($7).
It could cost more if you do not have the dye brush, a bowl to mix the bleach in, the foils, gloves, etc. We had already had those items so it helped to keep our costs down.
The reaction?
What did everybody think?
What has been the reaction of your family, kids? My kids love it so much! Well, kids will be kids and they were hamming it up for the camera by sticking out their tongues. But that wasn't what they thought of the new style!
They can't stop telling me how much they like it and they keep wanting to touch and play with it. My husband loves it. He was the one that encouraged me to finally do it after talking about it for years.
Do You Like It?
One final look - before and after!
One Month Later and a Haircut Too!
We are seriously looking good.
Ready to Dye Your Hair Blue?
Here are some of the products you will need:
Thanks for Visiting!
We love to hear from our readers. Thanks for dropping by. What do you think about going blue?
History: How to Dye Your Hair a Blue Color was originally created on Squidoo by JaguarJulie on May 12, 2014.
Do you want to know how to dye your hair a brilliant blue color? Well, my niece Rachelle recently decided to dye her hair blue! The moment I saw that first picture of her with her brilliant blue hair, I was amazed. I asked her, what is the name of that color? She said it was Ion Brilliance Sky Blue.
When I was growing up, we always talked about the old ladies with blue hair. Little did I know that blue hair on a younger gal could be so beguiling!
This is my interview with my niece, Rachelle Lesteshen. We asked her to tell us "how to dye your hair a blue color ... and not feel blue about doing it!"
P.S. By the way, we opted to add a little blue for our callouts throughout this page. It seemed kind of appropriate, you think?
Photo Credit: My Niece Rachelle after using Ion Color Brilliance Brights Semi-Permanent Hair Color Sky Blue. All photos of Rachelle edited by JaguarJulie.
What a thrill to interview my niece!
Who knew it would be about blue hair? Hey there, this is me! For a brief moment in the hair coloring process, my niece had hair that looked a bit like mine.
And, then she continued on to become a brilliant blue with Ion Color Brilliance Brights Semi-Permanent Hair Color Sky Blue.
I've always love the blue color, but hadn't thought about what it would be like to have blue hair! Perhaps you've seen my article on The Beautiful Color of Reflex Blue?
Well, after seeing my niece with her new jazzy color, I think I am liking that blue.
At my age, I am not brave enough to give this a try. Although I do believe I might try a wig of that color.
P.S. After putting together this interview with Rachelle, I was rather surprised to find so many young gals had actually picked this color and done YouTube video reviews! It seems to be THE color to try!
Why did you pick this color?
Why did you decide to go blue? Blue is my favorite color and I've always been drawn to brightly colored hair. I think it looks pretty.
I've always liked this color and had long thought about trying it. I guess I got the bug one weekend and decided to take the plunge.
In the past, I've actually tried other products to change my hair color, so this wouldn't be the first time. At least I love the color blue!
Had you considered another color? I only wanted blue, but I had thought about using a darker shade or another color in case the bleach wouldn't go light enough. I had been dying my hair red and dark brown in the past and it can be difficult to strip out colors with red tones. Once I saw that the bleach was getting it light enough, I was very happy I went with this shade of blue.
Dare to be a little different! I always knew that about my niece ... she is brave enough to be bold and unique ... even in her hair color.
 |
| The Step-by-Step Process Here we go ... no turning back! |
Foiling the hair to bleach it!
Did you need somebody to help you? A friend helped me! I needed help with bleaching my hair because I had never done that by myself before and I don't think I could reach the back of my own head to do the foils back there if I had tried.
My hair is pretty dark, so I needed to bleach my hair to a light blonde.
There are a number of additional products we could have used. Color strippers, toners to remove the yellow, etc.
To cut costs and because I was pretty confident that the bleach would work, we just bought lightener and the dye.
Foil is all on
I think I like this look!
Why foil? It's used to help control the bleach and keep it from getting on the areas you don't want bleached, like your roots.
We used two products from Sally's, the Salon Care Blue Flash Powder in a one ounce size along with a 30 volume creme developer.
The flash powder is an excellent product that got my hair light pretty fast without damaging it. I didn't pre-lighten my hair. I just went straight to bleaching it.
If you do not get your hair light enough or if you are not able to remove all the yellow tones from your hair, this color will not work and could turn green! (Yellow + Blue)
Hair has been bleached blonde
I like it!
Did you consider staying at the bleached color before continuing? I would probably never choose to be a blonde because I don't think it looks good with my skin tone and my eyebrows are really dark and would require lightening, too.
However, we were kind of surprised at how nice my hair color looked after bleaching!
I wish I could handle this type of blonde ... looks a little strawberry.
It doesn't really go well with my skin tones, don't you agree?
Hmmm, this color looks pretty nice!
Yes, I think I look like a movie star.
Hmmm, which one? Hey, let's wait a moment while I admire how I look.
Now my hair was to a perfect bleached color and ready for the next step in the process.
I did not condition my hair after bleaching so that it would be receptive to the dye.
Oh well ... time to move on.
What other colors would you try? I'm willing to try teal and purple and maybe a bright red.
Ooops, there it is!
It's kind of messy stuff.
Why this brand? Originally, I was looking at the Manic Panic brand, but my friend did some research and found that the Ion Brilliance brand and this color was more vibrant and tends to last longer.
Where did you buy it? I was able to purchase this from my local Sally Beauty Supply store.
How many boxes? We used 3 boxes. Boy was I thankful that I bought 3 tubes of the sky blue dye!
My friend who was helping me had on rubber gloves and a tie-dye t-shirt. How appropriate, you know? We were pretty careful to keep most of the stuff on my head.
I used some color remover wipes to take the color off my face and skin when it strayed. Once we got the stuff applied to my head, we wrapped the hair with some saran wrap.
 |
| Let me sleep on it! We didn't realize that this was a lengthy process. |
Overnight application?
Hey, who knew?
How long did it take? It took a long time. We probably spent 5-6 hours on bleaching and applying the dye.
I ended up sleeping with the dye in my hair and washing it out in the morning.
How long do you think you will you stay with this color? I've wanted to go blue for years and years, so I'll probably keep it blue for at least the summer, if not longer.
It requires quite a bit of upkeep, though. I have dark roots, so they will have to be re-bleached frequently and the blue fades quickly.
If I get tired of all that, I may try a darker blue or something else.
Let's summarize the how-to step-by-step instructions!
What were the steps ... So I see you had to bleach your hair first? I didn't realize that would be a step! First of all, we are not professionals and we were just trying this for fun, so our techniques may not be what most consider correct. These are our how-to, step-by-step instructions that we did in my home.
#1 THE BLEACHING PROCESS USING FOIL: I had to bleach my hair because the blue would be brighter on really light hair and my hair was previously dyed a dark brown.
My friend clipped my hair into sections to keep it out of the way. She then mixed up the lightener, put a piece of foil under my hair, and applied the bleach solution to about one inch sections just on the ends of my hair, making sure to avoid the roots/uncolored areas of my hair.
This is because the hair closest to the scalp will bleach more easily and more quickly than the rest of my hair. Those areas should be saved for the last 15-20 minutes of the bleaching.
After applying the bleach solution, the foils were then folded up neatly. This step was then repeated multiple times until all the hair was done. We left the bleach on and checked the process and color about every 20 minutes.
Once the hair on the back of my head was at the right shade, we started removing the foils in the order that we did them in, giving the rest of the hair time to get to the same color. After they were all removed, we applied bleach all over, focusing on my roots. This stage made my scalp tingle a lot.
#2 RINSE AND DRY: Once we were happy with the overall color of my hair, I rinsed it out. We then dried it to check the color. We both felt that the ends were still too yellow, but my roots were the perfect color.
#3 REPEAT THE BLEACHING PROCESS: We decided to do another bleaching session for the ends of my hair to get them lighter. We repeated the foil process, continued to check the color, and washed it back out when it was how we liked it.
#4 APPLYING THE BLUE DYE: At that point, we were ready for the blue and we applied it all over. I decided I wanted to leave it in for a long time to maximize the brightness of the color, so I slept with the color on my hair.
#5 RINSE WELL: I woke up in the morning and washed it out, waiting for the water to run clear.
#6 DEEP CONDITION: I then applied one of my deep conditioning packets to help restore my hair after the damage from the processing it went through.
 |
| Drumroll : The finished product! |
How do you like it?
It seems pretty uniform.
We were so thrilled to see the overall colors throughout my hair after we rinsed the dye. Keep in mind, you should not shampoo after because it will remove some of the colors.
What did it cost to go blue? I estimate that it cost us about $40-$50 dollars for just the hair dye ($15), powder lightener tub ($20), large container of developer ($4), and a few packets of deep conditioner ($7).
It could cost more if you do not have the dye brush, a bowl to mix the bleach in, the foils, gloves, etc. We had already had those items so it helped to keep our costs down.
The reaction?
What did everybody think?
What has been the reaction of your family, kids? My kids love it so much! Well, kids will be kids and they were hamming it up for the camera by sticking out their tongues. But that wasn't what they thought of the new style!
They can't stop telling me how much they like it and they keep wanting to touch and play with it. My husband loves it. He was the one that encouraged me to finally do it after talking about it for years.
Do You Like It?
 |
| Thanks Rachelle! Follow Rachelle Lesteshen on Facebook. She is a 30-something, mother of two girls, living in Columbus, Ohio. |
One final look - before and after!
One Month Later and a Haircut Too!
We are seriously looking good.
Ready to Dye Your Hair Blue?
Here are some of the products you will need:
- Salon Care Blue Flash Powder Lightener 1 lb.
- Salon Care 30 Volume Creme Developer 16 oz.
- Ion Color Brilliance Brights Semi-Permanent Hair Color Sky Blue
Thanks for Visiting!
We love to hear from our readers. Thanks for dropping by. What do you think about going blue?
History: How to Dye Your Hair a Blue Color was originally created on Squidoo by JaguarJulie on May 12, 2014.
How to Create a Patio with Stone Pavers - A Step-by-Step DIY
How to Create a Patio with Stone Pavers : A Step-by-Step DIY. Do you want to know how to create a beautiful patio with stone pavers that looks like a 5-star home and garden project? Well you have come to the right place to learn how easy it is! There is no need to mix and pour concrete.
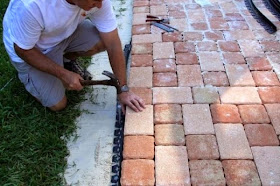
This is a do-it-yourself project that you can knock out in one weekend. See that picture? That is the ex-hubby, working with the actual materials we used! You can use this same DIY principle to create a walkway for your garden.
Make that patio larger or smaller; it is your do-it-yourself project. You decide how big or how small you want to make it as it is scalable up or down by following the pattern layout we have provided.
I have included pictures from our actual job showing you a before and after picture along with step-by-step instructions and pictures. You too can create a beautiful patio for your home and garden with this step-by-step how-to!
You know, I was so proud of my hubby [now the ex] because it was well-planned, very organized and quite timely from start to finish! You can do it. Start now on your very own do-it-yourself patio.
Photo Credit: Working on that DIY project by JaguarJulie w/the ex.
Have You Ever Worked With Patio Stone Pavers?
Are you a DIY Handyman? What is your experience level?
My Confession : I Was a Newbie
And, you too can learn how to create a beautiful stone paver patio!
"I am so thrilled to bring you our patio paver project in an easy to follow format. You can do it too! Recently, I completed another patio stone paver project all by myself. One step at a time!"
Folks, fast forward. Today I am divorced from my industrious hubby who you can see working in that intro module. We did a nice job of creating that patio with the stone pavers. I am happy to report that I used my experience on that project and have created another smaller patio in my new home.
The challenging part can be getting all the materials to your home with a sports car. It helps if you have Home Depot or Lowe's deliver your materials. --The Brand Ambassador, JaguarJulie!
P.S. I was the Official Squidoo Backyard Gardener Contributor! Did you know that? Well, you probably guessed it. But, I bet you didn't know that I also am one of the Blondes that DIY! #blondesthatdiy
An Overview
Before View of the Patio
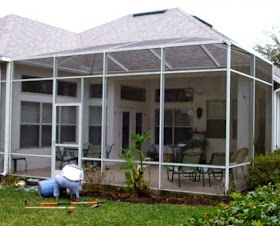
This is an actual before picture of our back patio area. We actually underwent a home renovation project to enclose our patio before we decided to create a back yard patio with stone pavers. This picture gives you a good perspective of the overall job.
Materials for Patio Paver Project DIY
Stone Pavers, Step 1 Paver Base and Step 2 Leveling Sand
Materials List and Cost
Patio Stone Pavers and Step 1 Paver Base and Step 2 Leveling Sand
Home Depot delivered the pallet of materials needed for this 100 square foot patio project. Estimated cost of materials: $600.00 which includes a $79.00 delivery fee.
120 - 6" x 9" Concord Cobble 45mm orange/sand stone pavers
175 - 6" x 6" Concord Cobble 45mm orange/sand stone pavers
15 bags - Step 1 Paver Base
20 bags - Step 2 Leveling Sand
NOTE: Before this pallet of materials was delivered, we started the base with a separate load of 15 bags - Step 1 Paver Base. We brought those home in the back of our Nissan Murano -- and then opted to have the rest delivered.
Establish a Pattern
Determine the pattern you will use with your pavers. You can go from a simple mix to elaborate patterns with different colors and sizes of the pavers. This is a easy to duplicate pattern using a mix of 6" x 6" and 6" x 9" Concord Cobble 45mm orange/sand stone pavers. For our needs and budget, and since it was our first attempt at laying the pavers, we kept it on the simple side with using a mix of 6" x 6" and 6" x 9" bricks. With a little trial and error, we found a repeating pattern that worked out well for our layout.
Working with Step 1 Paver Base
Keep it Dry!
Our little do-it-yourself patio stone paver project was only 8' x 13' which tied into an existing 3' x 4' concrete pad. The hardest part of the project, other than hauling around a bunch of heavy bags of dirt and stacks of bricks, is the initial grading of the ground to get the level and the slope to tie in to the surroundings. We had to work off of the concrete stoop to start and grade the slope down from the house. The best way would probably be to carefully put strings with level indicators, measuring the height from the ground to get the best consistency with the right slope. We did not have the patience for that and pretty much eyeballed it with spot measurements in the key places.
If you have grass to remove, we recommend using a total vegetation killer ahead of time. After the grass has died, dig out most of it and rake out the area to the approximate grade you want. Tamp down the dirt, smooth out the lumps and tamp some more.
Tamping Down the Step 1 Base Gravel
Pour in the base gravel and spread out to have at least a one inch layer. If your back is still intact, tamp away again. If the twinges start, take a break and a couple of your favorite pain killers and muscle relaxants and come back later.
Leveling the Step 2 Leveling Sand
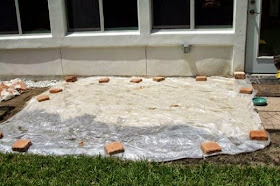
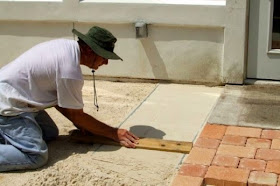
Once the step one gravel is tamped in place the fun can begin. Lay down the two lengths of pipe about 3' apart, working in a direction down grade. Pour down the leveling sand and screed back and forth with the 2x4 to get a smooth level fill between the pipes. Fill in the grooves left by the pipe. Sprinkle the sand in and lightly tamp in and smooth with your fingers. I found it best to screed a few side by side sections at a time, laying the bricks as you go. Once the sand is down you do not want to disturb it.
Duplicating the Pattern
It is relatively easy to duplicate your pattern with the patio stone pavers by referring to your pattern guide. Once the bricks are placed, you can walk on them to place the next section. This is the fun part because it goes relatively fast after the hours of the grunt preparation work.
Adding More of the Step 2 Leveling Sand
Continue working in square sections. Repeat the process where you lay down the two lengths of pipe about 3' apart, working in a direction down grade. Pour down more of the leveling sand and screed back and forth with the 2x4 to get a smooth level fill between the pipes. Fill in the grooves left by the pipe. Sprinkle the sand in and lightly tamp in and smooth with your fingers.
Midway -- Leveling Step 2 Sand
And Continuing the Patio Stone Pavers Pattern
You are about midway through your project and starting to feel like a pro at working with the patio stone pavers!
Finishing the Placement of the Patio Stone Pavers
If you have measured your patio accurately, you should find that you have enough of the stone pavers. Our project was almost perfect, as we needed 2 more of the 6" x 9" and 6 more of the 6" x 6" patio stone pavers. Ah, the end is in sight!
Preparing the Patio Stone Pavers for Edging
Once the bricks are all in place, you then put down the retaining edge.
Securing the Edging of the Patio Stone Pavers
Adding stakes to your edging will keep the bricks in place.
Adding the Remainder of the Step 2 Leveling Sand
You have finished edging the patio. Next you will want to fill in the spaces between the pavers with the leveling sand. This works much better if the sand is good and dry. Sweep the sand into the cracks and finish by hosing off the excess.
Completing the Addition of the Remainder of the Step 2 Leveling Sand
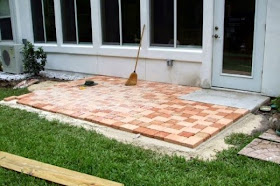
The patio is finished! Stand back and enjoy the look of your new patio to get an idea of how you will want to landscape around the stone pavers.
Drumroll -- After View of the Patio
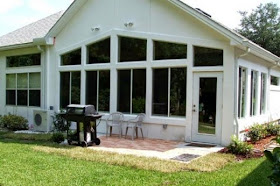
Adding the finishing touches to the patio with sod and shrubs. We waited about one week before we put our outdoor gas grill and chairs on the patio stone pavers to ensure that the stones had settled. Now you are ready for entertaining!
Final Approval of the Patio Paver Project DIY
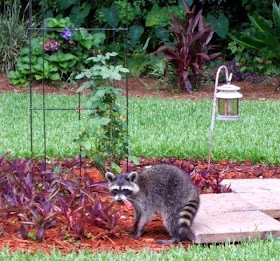
Receiving the Approval of the #1 Neighborhood Resident is Important! - Rocky the Raccoon has approved the patio stone pavers job!
We were finishing up the patio project when who should show up? It's Rocky the Raccoon who has been kind enough to actually pose for another lens in a photo caption contest.
Need More Patio Paver Ideas?
Get a copy of Pavers 101: Patios and Other Projects You Can Do. We all could use some inspiration with our DIY projects!
From a wonderful circular patio centered around a firepit, to a demonstration walkway that illustrates how to lay basketweave, running brick, and herringbone patterns, this book is the perfect resource for anyone who wants to undertake a great home improvement project.
Learn how to lay the groundwork, study details for edging and popular paver designs, and finish up like a pro. Clear photos detail every step in the process, and a gallery of more than 100 finished projects will inspire you to get to work. All you need is the muscle and a good back of course!
More Patio Stone Projects!
I moved to Leesburg, Florida in November 2015 as a single senior gal. I believe this original patio stone paver project with the ex-husband inspired me to try my own stone projects by myself. In February 2016, I designed and completed a golf cart path stone project down my side yard.
In March 2019, I augmented the golf cart path project by using river pebbles for drainage along the outside edge and then ultimately replacing the red river rock with the river pebbles. I moved that river rock to my back yard. That was quite the job picking up and cleaning the river rock before moving it!!
I've also used eighty 16-inch patio stones to create a patio area in the side yard to the West of my house. That was a lot of manual labor getting the stones at HomeDepot and bringing them home to place them in the side yard. Girl Power!!
Since those stone projects, I've now created two walking paths through my front yard garden with twenty-six of the 16-inch patio stones.
Thanks for visiting!
Did you find this step-by-step project helpful and easy to follow? Do you have any questions about any of the steps on how to work with patio stone pavers? Have you actually done a job like this yourself? Would you be able to create your own patio? I'd love to hear from you. Please take a moment to drop me a line!
History: How to Create a Patio with Stone Pavers was originally created on Squidoo by JaguarJulie on July 13, 2009. On July 14, 2009 this lens earned the Squidoo Purple Star Award for quality content.
This is a do-it-yourself project that you can knock out in one weekend. See that picture? That is the ex-hubby, working with the actual materials we used! You can use this same DIY principle to create a walkway for your garden.
Make that patio larger or smaller; it is your do-it-yourself project. You decide how big or how small you want to make it as it is scalable up or down by following the pattern layout we have provided.
I have included pictures from our actual job showing you a before and after picture along with step-by-step instructions and pictures. You too can create a beautiful patio for your home and garden with this step-by-step how-to!
You know, I was so proud of my hubby [now the ex] because it was well-planned, very organized and quite timely from start to finish! You can do it. Start now on your very own do-it-yourself patio.
Photo Credit: Working on that DIY project by JaguarJulie w/the ex.
Have You Ever Worked With Patio Stone Pavers?
Are you a DIY Handyman? What is your experience level?
- I'm a newbie!
- I have watched someone else.
- I am an expert!
My Confession : I Was a Newbie
And, you too can learn how to create a beautiful stone paver patio!
"I am so thrilled to bring you our patio paver project in an easy to follow format. You can do it too! Recently, I completed another patio stone paver project all by myself. One step at a time!"
Folks, fast forward. Today I am divorced from my industrious hubby who you can see working in that intro module. We did a nice job of creating that patio with the stone pavers. I am happy to report that I used my experience on that project and have created another smaller patio in my new home.
The challenging part can be getting all the materials to your home with a sports car. It helps if you have Home Depot or Lowe's deliver your materials. --The Brand Ambassador, JaguarJulie!
P.S. I was the Official Squidoo Backyard Gardener Contributor! Did you know that? Well, you probably guessed it. But, I bet you didn't know that I also am one of the Blondes that DIY! #blondesthatdiy
An Overview
- Determine the layout for the patio area.
- Determine the style of pavers you want to use and how many of each size you will need.
- Tools you will need: flat edge shovel, Tamper, level, potato rake, wheel barrow or hand truck, two 5' x 3/4" steel pipe, 3-4' length of 2x4.
- Materials you will need: Step one base gravel, step two leveling sand, pavers, paver edging and stakes.
- Determine the pattern you will use with your pavers. You can go from a simple mix to elaborate patterns with different colors and sizes of the pavers.
- Other important requirement is a good back. This project is somewhat physical but you can do it at your own pace.
- You can get "how to" information from brochures at Home Depot and Lowes.
Before View of the Patio
This is an actual before picture of our back patio area. We actually underwent a home renovation project to enclose our patio before we decided to create a back yard patio with stone pavers. This picture gives you a good perspective of the overall job.
Materials for Patio Paver Project DIY
Stone Pavers, Step 1 Paver Base and Step 2 Leveling Sand
The pallet of materials for your patio stone pavers project.
 |
| A 100 Square Foot Patio Costs About $600.00 DIY |
Materials List and Cost
Patio Stone Pavers and Step 1 Paver Base and Step 2 Leveling Sand
Home Depot delivered the pallet of materials needed for this 100 square foot patio project. Estimated cost of materials: $600.00 which includes a $79.00 delivery fee.
120 - 6" x 9" Concord Cobble 45mm orange/sand stone pavers
175 - 6" x 6" Concord Cobble 45mm orange/sand stone pavers
15 bags - Step 1 Paver Base
20 bags - Step 2 Leveling Sand
NOTE: Before this pallet of materials was delivered, we started the base with a separate load of 15 bags - Step 1 Paver Base. We brought those home in the back of our Nissan Murano -- and then opted to have the rest delivered.
 |
| Tools You Will Need Flat Edge Shovel, Tamper, Level, Potato Rake, Wheel Barrow or Hand Truck, two 5' x 3/4" Steel Pipes, 3-4' Length of 2x4 |
Establish a Pattern
Determine the pattern you will use with your pavers. You can go from a simple mix to elaborate patterns with different colors and sizes of the pavers. This is a easy to duplicate pattern using a mix of 6" x 6" and 6" x 9" Concord Cobble 45mm orange/sand stone pavers. For our needs and budget, and since it was our first attempt at laying the pavers, we kept it on the simple side with using a mix of 6" x 6" and 6" x 9" bricks. With a little trial and error, we found a repeating pattern that worked out well for our layout.
 |
| Other Important Requirement: A Good Back! This project is somewhat physical, but you can do it at your own pace. We found it rewarding with only one minor back outage. |
Working with Step 1 Paver Base
Keep it Dry!
Our little do-it-yourself patio stone paver project was only 8' x 13' which tied into an existing 3' x 4' concrete pad. The hardest part of the project, other than hauling around a bunch of heavy bags of dirt and stacks of bricks, is the initial grading of the ground to get the level and the slope to tie in to the surroundings. We had to work off of the concrete stoop to start and grade the slope down from the house. The best way would probably be to carefully put strings with level indicators, measuring the height from the ground to get the best consistency with the right slope. We did not have the patience for that and pretty much eyeballed it with spot measurements in the key places.
If you have grass to remove, we recommend using a total vegetation killer ahead of time. After the grass has died, dig out most of it and rake out the area to the approximate grade you want. Tamp down the dirt, smooth out the lumps and tamp some more.
Tamping Down the Step 1 Base Gravel
Pour in the base gravel and spread out to have at least a one inch layer. If your back is still intact, tamp away again. If the twinges start, take a break and a couple of your favorite pain killers and muscle relaxants and come back later.
Leveling the Step 2 Leveling Sand
Once the step one gravel is tamped in place the fun can begin. Lay down the two lengths of pipe about 3' apart, working in a direction down grade. Pour down the leveling sand and screed back and forth with the 2x4 to get a smooth level fill between the pipes. Fill in the grooves left by the pipe. Sprinkle the sand in and lightly tamp in and smooth with your fingers. I found it best to screed a few side by side sections at a time, laying the bricks as you go. Once the sand is down you do not want to disturb it.
Duplicating the Pattern
It is relatively easy to duplicate your pattern with the patio stone pavers by referring to your pattern guide. Once the bricks are placed, you can walk on them to place the next section. This is the fun part because it goes relatively fast after the hours of the grunt preparation work.
Adding More of the Step 2 Leveling Sand
Continue working in square sections. Repeat the process where you lay down the two lengths of pipe about 3' apart, working in a direction down grade. Pour down more of the leveling sand and screed back and forth with the 2x4 to get a smooth level fill between the pipes. Fill in the grooves left by the pipe. Sprinkle the sand in and lightly tamp in and smooth with your fingers.
Midway -- Leveling Step 2 Sand
And Continuing the Patio Stone Pavers Pattern
You are about midway through your project and starting to feel like a pro at working with the patio stone pavers!
Finishing the Placement of the Patio Stone Pavers
If you have measured your patio accurately, you should find that you have enough of the stone pavers. Our project was almost perfect, as we needed 2 more of the 6" x 9" and 6 more of the 6" x 6" patio stone pavers. Ah, the end is in sight!
Preparing the Patio Stone Pavers for Edging
Once the bricks are all in place, you then put down the retaining edge.
Securing the Edging of the Patio Stone Pavers
Adding stakes to your edging will keep the bricks in place.
Adding the Remainder of the Step 2 Leveling Sand
You have finished edging the patio. Next you will want to fill in the spaces between the pavers with the leveling sand. This works much better if the sand is good and dry. Sweep the sand into the cracks and finish by hosing off the excess.
Completing the Addition of the Remainder of the Step 2 Leveling Sand
The patio is finished! Stand back and enjoy the look of your new patio to get an idea of how you will want to landscape around the stone pavers.
Drumroll -- After View of the Patio
Adding the finishing touches to the patio with sod and shrubs. We waited about one week before we put our outdoor gas grill and chairs on the patio stone pavers to ensure that the stones had settled. Now you are ready for entertaining!
Final Approval of the Patio Paver Project DIY
Receiving the Approval of the #1 Neighborhood Resident is Important! - Rocky the Raccoon has approved the patio stone pavers job!
We were finishing up the patio project when who should show up? It's Rocky the Raccoon who has been kind enough to actually pose for another lens in a photo caption contest.
 |
| How To Tips to Create a Patio With Stone Pavers You can get "how to" information from brochures at Home Depot and Lowes. Some patio paver projects tips are also available on the internet. |
Need More Patio Paver Ideas?
Get a copy of Pavers 101: Patios and Other Projects You Can Do. We all could use some inspiration with our DIY projects!
From a wonderful circular patio centered around a firepit, to a demonstration walkway that illustrates how to lay basketweave, running brick, and herringbone patterns, this book is the perfect resource for anyone who wants to undertake a great home improvement project.
Learn how to lay the groundwork, study details for edging and popular paver designs, and finish up like a pro. Clear photos detail every step in the process, and a gallery of more than 100 finished projects will inspire you to get to work. All you need is the muscle and a good back of course!
More Patio Stone Projects!
I moved to Leesburg, Florida in November 2015 as a single senior gal. I believe this original patio stone paver project with the ex-husband inspired me to try my own stone projects by myself. In February 2016, I designed and completed a golf cart path stone project down my side yard.
 |
| Julie Ann Brady - Golf Cart Path Project in Leesburg Florida |
 |
| Julie Ann Brady - Golf Cart Path Project in Leesburg Florida |
I've also used eighty 16-inch patio stones to create a patio area in the side yard to the West of my house. That was a lot of manual labor getting the stones at HomeDepot and bringing them home to place them in the side yard. Girl Power!!
Since those stone projects, I've now created two walking paths through my front yard garden with twenty-six of the 16-inch patio stones.
Thanks for visiting!
Did you find this step-by-step project helpful and easy to follow? Do you have any questions about any of the steps on how to work with patio stone pavers? Have you actually done a job like this yourself? Would you be able to create your own patio? I'd love to hear from you. Please take a moment to drop me a line!
History: How to Create a Patio with Stone Pavers was originally created on Squidoo by JaguarJulie on July 13, 2009. On July 14, 2009 this lens earned the Squidoo Purple Star Award for quality content.
